
What will the program do? If you look at the STK 200, there is a row of 10 LEDs numbered from 0 to 7 then "ISP" and "ON." These are the built-in LEDs. Our program will make the LEDs numbered from 0 to 7 blink on and off at a rate perceptible to the human eye. In microcontroller terms, this means physically connecting the LEDs to PORTB and sending alternating HIGH/LOW signals to PORTB. Note that is all output - no input. If you don't know what PORTB is, check my Basic Layout Guide (link).
Step 1 - Create a new project: Go ahead and open AVR Studio 5. From the startup screen, go to File>New>Project... and you should see a New Project dialog box. At the top left of the dialog box, select the C templates and then choose "C Executable Project" in the middle of the screen. At the bottom, fill in "blink" as the name and this should automatically fill the solution name field with the same text. Also, make sure that the "Create directory for solution" box is checked. This checkbox will not affect your code at all, but it will keep your AVRStudio folder better organized. Look at the picture below and make sure your screen looks the same:
 |
| STK 200: New Project Dialog Box |
 |
| STK 200: Blank C Template |
#include <avr/io.h>
#include <util/delay.h>

int main(void)
{
    DDRB=0xFF;          //PORT B (LEDs) output
    while(1)
    {
        PORTB=0x00;     //LEDs ON
        _delay_ms(1000); //delay
        PORTB=0xFF;     //LEDs OFF
        _delay_ms(1000); //delay
    }
}
Once this code is entered, you need to build it. Hitting F7 is the easiest way to do that. Otherwise, go to Build>Build Solution. At the bottom of the screen you should end up with a message saying "Build succeeded."Step 3 - Make the connections: First, make sure that PORTB is connected to the LED header using the ribbon cable supplied with the kit. Then, connect the board to the computer using the ISP also supplied with the kit. If this doesn't make sense, look at the picture below and make it look the same:
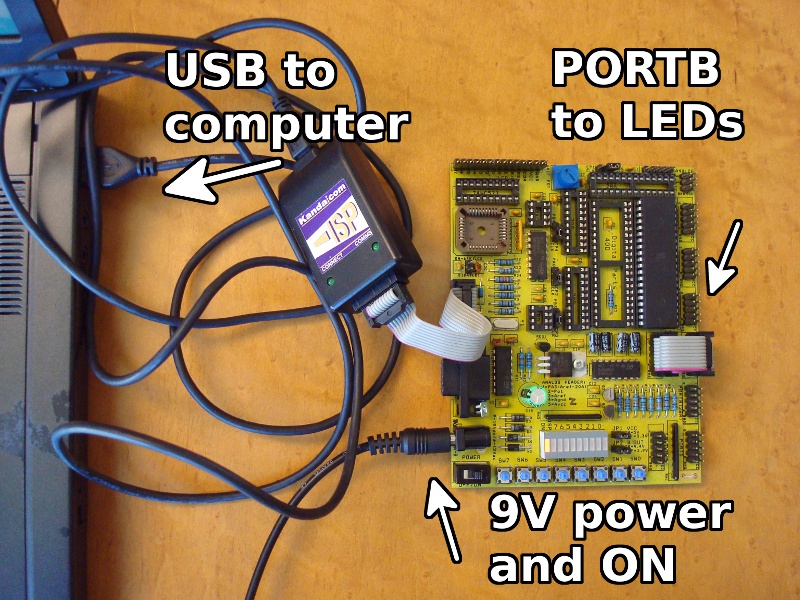 |
| STK 200: Make the Connections |
Step 4 - Transfer program to board: Now, we need to transfer the built program from step 2 to the microcontroller. Back in AVR Studio, go to Tools>AVRISP-U and you should see the AVRISP-U software pop up. Check the bottom left corner for a green light and text describing the correct device (in my case ATmega32). If you get a red light, check the hardware connections and try again. Now, we need to load the hex file to flash, so hit Ctrl+O or go to File>Load>Flash... and browse to the hex file of the program you just wrote. On my machine (windows xp), the projects are stored in separate files in My Documents\AVRStudio. I named my project "blink" and used the default file location, so the hex file had the following path:
C:\Documents and Settings\Nick\My Documents\AVRStudio\blink\blink\Debug\blink.hex
 |
| STK 200: Loading Program with AVRISP-U |
At that point, the LEDs should start blinking. The program will continue forever (or until you erase it or turn it off).
The screen should look something like what is below:
ReplyDeleteAwesome Tutorial Buddy... I am totally new in MC programming.
ReplyDeleteOne thing I want to ask where are LEDs in Your Board?? You Indicated them in Figure as "PORTB to LEDs"
Took me time to read all the comments, but I really enjoyed the article. It proved to be Very helpful to me and I am sure to all the commenters here! It’s always nice when you can not only be informed, but also entertained! LED high bay lamps
ReplyDeleteVery informative post! There is a lot of information here that can help any business get started with a successful social networking campaign. auxbeam
ReplyDeleteWhen I tried to learn programming, I was impressed how C languages is easy in terms of coding. It’s not a Python though, however it really easy. I think my friend will definitely will force his LED to work, at last. Because he tried it to do without any guides for a long time already. I think he need help. It’s very sad that reviews on Smartwritingservice.com didn’t had useful information for him. At least it very useful for me, you could check it too.
ReplyDeleteYou made such an interesting piece to read, giving every subject enlightenment for us to gain knowledge. Thanks for sharing the such information with us to read this...
ReplyDeletehttps://www.montypythonlive.com/best-led-grow-lights/
We have sell some products of different custom boxes.it is very useful and very low price please visits this site thanks and please share this post with your friends. Katon
ReplyDeleteLet me have a look and I will be able to find the best solution you might be interested in. I hope we will be able to beneficially cooperate.
ReplyDeleteVery good topic, similar texts are I do not know if they are as good as your work out. Advanced-Esthetic
ReplyDeleteReally a great addition. I have read this marvelous post. Thanks for sharing information about it. I really like that. Thanks so lot for your convene. led strips lights
ReplyDeleteGreat post full of useful tips! My site is fairly new and I am also having a hard time getting my readers to leave comments. Analytics shows they are coming to the site but I have a feeling “nobody wants to be first”. led strip manufacturers
ReplyDeleteCan you provide more examples in your next article? Local Handyman
ReplyDelete